Snowman Coaster Free Crochet Pattern
Who’s in the mood for Christmas crochet projects?
Anytime of the year is a good time to crochet Christmas gifts, but if you’re really not feeling the spirit yet, Pin It for later!
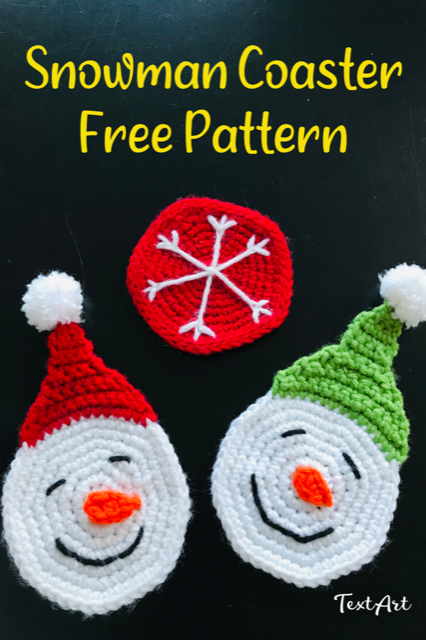
I have an adorable free crochet snowman coaster for you. So festive with their little Santa hats. These would make a quick and easy last minute crochet gift.

Perhaps wrap them up with a new mug and hot chocolate mix and you’re ready to go. I have this wonderful dairy-free hot chocolate mix for any loved ones who for whatever reason can’t have dairy. There is even a cute printable gift tag that you can download that includes how much mix to use per cup of milk.
Materials you’ll need to make the coasters:
- Bernat Super Value yarn in Black, White and Red or Green for the hats
- Darning Needle
- Scissors
- Glue for pompom (optional)
Stitches Used:
Slip Stitch – slst
Single Crochet – sc
Single Crochet Two Together – Sc2tog
This coaster is worked in the round with joins at the end of each round. It is worked as one piece so you won’t tie off and rejoin to make the hat, you just keep going. 😊

Let’s get crocheting some Snowman Coasters
With white and 4mm hook, make a magic circle.
Don’t know how? IT’S EASY. Learn how to with my clear simple to follow photo tutorial. Just follow the link below.
Coaster
Round 1: Ch1. Sc8. Tighten the circle. Join. (8sts)
Round 2: Ch1. 2Sc in each st around. Join. (16sts)
Round 3: Ch1. *Sc1, 2sc in the next st.* Repeat * to * around. Join. (24sts)
Round 4: Ch1. *Sc2, 2sc in the next st.* Repeat * to * around. Join. (32sts)
Round 5: Ch1. *Sc3, 2sc in the next st.* Repeat * to * around. Join. (40sts)
Round 6: Ch1. *Sc4, 2sc in the next st.* Repeat * to * around. Join. (48sts)
Round 7: Ch1. Sc1 in each stitch around. Join. (48sts)
Join with red.
Row 1: Ch1. Sc14. (14sts)
Row 2: Ch1. Turn. Sc2tog. Sc10. Sc2tog. (12sts)
Row 3: Ch1. Turn. Sc2tog. Sc8. Sc2tog. (10sts)
Row 4: Ch1. Turn. Sc2tog. Sc6. Sc2tog. (8sts)
Row 5: Ch1. Turn. Sc2tog. Sc4. Sc2tog. (6sts)
Row 6: Ch1. Turn. Sc2tog. Sc2. Sc2tog. (4sts)
Rows 7-10: Ch1. Turn. Sc across. (4sts)
Row 11: Ch1. Turn. Sc2tog twice. (2sts)
Row 12: Ch1. Turn. Sc2tog. (1sts)
Row 13: Ch1. Turn. Sc1. Tie off.
Mouth and Eyes
For the mouth and eyes, I found a strand of yarn sewn in, looked the best.


Nose
Small Nose
Ch4. Hdc1 into the second ch from the hook. Sc1. Slst into the last ch. Tie off and sew on.
Larger Nose
Ch5. Dc1 into the second ch from the hook. Hdc1. Sc1. Slst into the last ch. Tie off and sew on.
Pom-Pom
A fork makes a perfect little pom-pom for the hat. Here’s what you do…
Step 1: Cut a 6″ strand of yarn and insert it into the center of the fork.

Step 2: Wrap yarn around the fork about 50 times.

Step 3: Take the ends of your 6″ strand of yarn, pull it around the wrapped yarn, secure it tightly with a knot.

Step 4: Slide it off of the fork. Once again, wrap the ends of your 6″ strand around and secure it tightly with a knot. I also like to put a dab of glue in the center of the pom-pom before tightening the knot to ensure it stays put.

Step 5: Take your scissors and cut the looped yarn. Give your pom-pom a haircut and sew onto the coaster.
Step 6: Share this post with your friends!

Subscribe so you don’t miss any fun ideas 🙂


