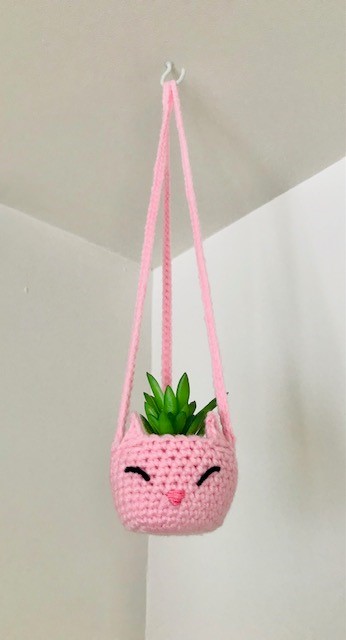
Mini Kitty Amigurumi Succulent Holder
This makes awesome kids room décor. Or adult décor… no judgement here 😁. I’ve also seen people hang these sort of things in their cars.
This would also make a quick and cheap last minute Christmas or birthday gift.

I found these sweet little fake succulents at the dollar store and I thought the shape of the pot would turn into a kitty nicely. So here we are.
They are very small. These little pots are only about 2.5″ wide. The amigurumi fits very snuggly around it. If you find for whatever reason it isn’t fitting, you can always go a hook size up.

Mini Kitty Amigurumi Plant Hanger with Succulent
A Cute Little Crochet design by Alicia Cromwell

Materials needed:
– Bernat Super Value yarn in pink or color of choice
– 3.5mm hook
– 1mm hook
– Darning Needle
– Pink and black embroidery thread
– Fake Succulent in an approximately 2.5” wide rounded pot
– A Stitch Marker (a bobby pin works)
Stitch abbreviations:
Ch – Chain
Sc – Single Crochet
2Sc – Make two single crochets into that stitch
Hdc – Half Double Crochet
Dc – Double Crochet
Size : The finished item ends up being approximately 13.5” long.
Note: I always use a stitch marker to mark the end of each round. Even a bobby pin works fine.
Let’s make cute kitty décor!
With your 3.5mm hook and pink Bernat yarn, make a magic circle.
If you don’t know how, check out this photo tutorial. You’ll be so happy you learned! It’s so simple.
Round 1: Ch1. Sc8 into the circle. Tighten the circle. (8sts)
Round 2: Sc2 in each st around. (16sts)
Round 3: *Sc1, 2sc in the next* Repeat around. (24sts)
Round 4: *Sc2, 2sc in the next* Repeat around. (32sts)
Rounds 5-13: Sc1 in each stitch around. (32sts)
Round 14: Sc1. *Ch5. Slip stitch into the second ch from the hook. Sc1 into the next ch. Hdc1 into the next. Dc1 into the last ch. Skip2sts. Slst into the next*. Sc5. Repeat * to *. Sc20. (32sts)
Creating the hangers and loops
65 stitches made the holder about 13.5” long from top to bottom. If you want them a little shorter, to hang in the car of something, ch50 instead or however long you decide is best.
Sc1. *Ch65. Slst into the 12th ch from the hook. Slst down the rest of the chain. Slst into the sc you started chaining from. Tie off.*
Join to the stitch right beside the other ear. Repeat * to *.
For the last hanger, join to the 10th stitch in between the remaining sts and repeat Row * to *.
Making the Eyes
Separate a piece of black embroidery thread in half so you are working with 3 strands.
With a 1mm hook, Ch10.
Sew on. Repeat for the other eye. I sewed mine on while it had the succulent inside. It should be tight.
Making the Nose
Take a pink piece of embroidery thread. Don’t separate it this time. Sew on a nose. See the image below. I found it the easiest to sew in the same direction each time.

Finishing the loops of the hangers
I’m going to do my best to guide you through this.
Cut a strand of yarn that is approximately a yard/3 feet long.
Gather the three loops together, ensuring the hangers are straight and hanging the way you want them to. Take your strand of yarn, and starting at the top of the loops, and about a foot along the three-foot strand, start wrapping the yarn around all three loops, working down one side towards the bottom.
Now take the other side of the three foot strand (still at the top of the loops) and wrap the yarn down the other side.
Now both ends of the yarn should meet. You can tie these into a knot.


With the shorter yarn strand, make a loop that hangs down. The tail will be up near the loop at the top as in the first picture on the left above.
With the longer strand of yarn, wrap around the three hanger strands about 8 times. Now it should look like the picture above on the right.
Feed the end of the yarn through the loop hanging down. Pull the top of the short piece of yarn that is at the top loop, and it will pull the tail inside of the yarn you wrapped, hiding the end.

Cut the remaining tail of the strand that was pulled up into the wrapped yarn. With your darning needle, feed the remaining tail down through the wound yarn and cut.
You’re done! I hope you loved this pattern.
Please share, leave a comment, and sign up for my newsletter so you don’t miss any random fun!
Join the Cute Little Crochet Facebook group for inspiration, to share your projects, ask questions and more. Crochet groups make Facebook FUN.
https://www.facebook.com/groups/1701552460113719/
The pattern and photographs contained in this document are property of Alicia Cromwell and Cute Little Crochet. This pattern is available for personal use only. No unauthorized reproduction, in whole or in part, or distribution of this pattern or content is allowed. You are welcome to sell the finished products, please give link to my pattern. Copyright 2021


