Christmas Elf Free Amigurumi Pattern
This pattern is still being tested, but I had to get it out to you before Christmas!
This pattern is available as a Dollar Download.

My sister asked me to make a couple of fun Christmas hats for herself and husband some years ago. Fast forward to now, she wanted me to make a matching one for their sweet little guy too, and of course… I had to make a matching elf stuffy!

I ended up using a hat pattern on the Make and Do Crew site. I did change mine a little bit. I switched colors every 2 rows, didn’t add ears and made a trim of FPDC and BPDC. But I still think making a hat following the pattern as is would be fantastic.
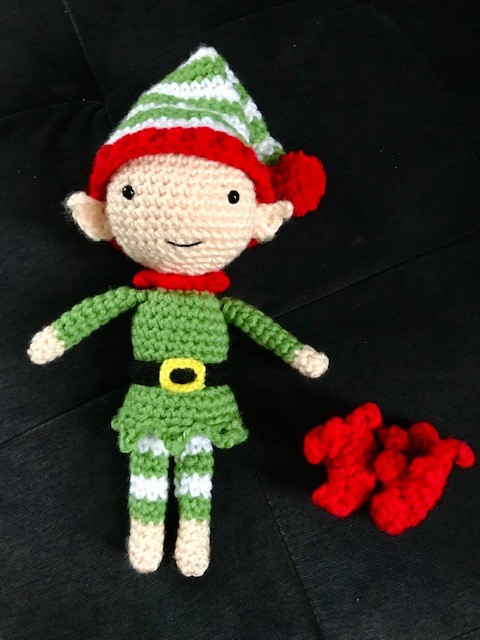
I LOVE how they worked out.
The booties can be put on and taken off. I opted to sew on the hat so it didn’t get lost.

Materials Required:
- Bernat Super Value Yarn in Red, Green, White, Peach, Black, and Yellow
- Darning Needle
- Scissors
- Small Safety Eyes
- 5 mm crochet hook
- 2mm crochet hook (for belt buckle)
- Black embroidery thread
Gauge – Not important, but make sure you use a small enough hook to ensure your stitches are nice and tight.
Notes:
The hat is made in rounds that join with a slst, and chain to start a new round. The chain does not count as a stitch.
The rest of the pattern is made amigurumi style.
Size:
The finished elf is approximately 10” tall with a bent hat on 😊.

Or purchase a PDF for one dollar.
Stitch Abbreviations:
Slst – Slip stitch St – Stitch
Ch – Chain Sts – Stitches
Sc – Single crochet Hdc – Half double crochet
Sc2tog – Single crochet two together Tc – Triple Crochet
Dc – Double Crochet
Let’s crochet an adorable elf!
Head
Make a magic circle with peach.
Don’t know how? Check out my picture tutorial. You’ll be so glad you learned how easy it is.
Round 1 – Sc6. Do not join. Add stitch marker and continue amigurumi style. (6sts)
Round 2 – Sc2 in each st around. (12sts)
Round 3 – *Sc1, 2sc in the next st.* Repeat around. (18sts)
Round 4 – *Sc2, 2sc in the next st.* Repeat around. (24sts)
Round 5 – *Sc3, 2sc in the next st.* Repeat around. (30sts)
Round 6 – *Sc4, 2sc in the next st.* Repeat around. (36sts)
Round 7 – *Sc5, 2sc in the next.* Repeat around. (42sts)
Rounds 8 – 15 – Sc1 in each stitch around. (42sts)
Round 16 – *Sc5, Sc2tog.* Repeat around. (36sts)
Round 17 – *Sc4, Sc2tog.* Repeat around. (30sts)
Take a minute to insert your safety eyes.
Round 18 – *Sc3, Sc2tog*. Repeat around. (24sts)
Round 19 – *Sc2, Sc2tog*. Repeat around. (18sts)
Round 20 – *Sc1, Sc2tog*. Repeat around. (12sts)
Round 21 – Sc1 in each stitch around. (12sts)
Stuff the head. Change colors to RED.
Round 22 – Sc1 in each stitch around. (12sts)
Creating the collar
IN FRONT LOOPS ONLY.
Round 23 – *Sc2. Ch4. Slst into the 3rd ch from the hook.* Repeat * to * around.
Tie off.
Body with GREEN.
Round 1 – Join to the back loops of the round you just finished. Sc12. (12sts)
Round 2 – 2sc in each stitch around. (24sts)
Rounds 3 – 6 – Sc1 in each stitch around. (24sts)
Creating the Shirt
Round 7 – IN FRONT LOOPS ONLY. *Sc5, 2sc in the next st.* Repeat * to * around. (28sts)
Round 8 & 9 – Sc1 in each stitch around. (28sts)
Round 10 – *Sc1. Ch4. Slip stitch into the second ch from the hook. Still working down the chain, Sc1, Dc1. Skip 2sts. Slip stitch into the next stitch.* Repeat * to * around.
Tie off.
Closing the Body
Find the back loops from round 7 and join with GREEN.
Now we’re going to close in the body.
Round 1- Ch1. Sc1 in each back loop around. (24sts)
Round 2 – Sc2tog around. (12sts)
Stuff the body as needed as you close it up.
Round 3 – Sc2tog until the hole is pretty much closed. Tie off. Sew up. Weave in ends.
Arms
Make a magic circle with PEACH.
Round 1 – Ch1. Make 6 single crochet. Tighten the circle. (6sts)
Rounds 2 & 3 – Sc1 in each stitch around. (6sts)
Rounds 4 – 11 – With GREEN. Sc1 in each stitch around. (6sts)
Tie off. Sew onto the body.
Ears
Left Ear –
Ch5. Slip stitch into the third ch from the hook. Skip one ch. Dc5 into the last stitch. Tie off. Sew onto the head around rows
Right Ear –
Ch3. 3Dc into the 3rd ch from the hook. Ch3. Slip stitch into the 3rd chain from the hook. Ch2. Slip stitch into the space created from making the double crochets. Tie off.
Legs
Make a magic circle with PEACH.
Round 1 – Ch1. Make 10sc. Tighten the circle. (10sts)
Round 2 – Sc10. (10sts)
Round 3 – Sc1. Sc2tog twice. Sc5. (8sts)
Rounds 4 & 5 – Sc 1 in each st around. (8sts)
Rounds 6 & 7 – With GREEN. Sc1 in each st around. Join. (8sts)
Rounds 8 & 9 – With WHITE. Sc2 in each st around.
Repeat rounds 6-9. Then repeat Round 6 one more time.
Tie off. Weave in ends and sew onto the body.
Shoes
Make a magic circle with RED.
Round 1 – Ch1. Sc3. Hdc1, Dc1, Tc1, Dc1, Hdc1, Sc2. Join. (10sts)
Round 2 – Ch1. Sc3. Hdc1, Dc1. Tc2 in the next st,. Ch3, Slst into the 2nd ch from the hook. Tc2 into the same space as the last triple crochets you made. Dc1, Hdc1. Sc2. Join.
Round 3 – Ch.1. Sc6. Skip the whole toe and rejoin on the opposite side of the shoe, so that you will have 4 more single crochets to make. See the picture below. Join.
Rounds 4-5 – Ch1. Sc1 in each stitch around. (10sts)
Round 6 – Turn for this row. *Ch4, Slst into the second ch from the hook, sc1 in the next chain, hdc1 in the next chain. Slst2.* Repeat * to * around.
Hat
Make a magic circle with GREEN.
Round 1 – Sc6. Tighten the circle. Join with a slst. (6sts)
Round 2 – Ch1. Sc1 in each st around. (6sts)
Rounds 3 & 4 – With WHITE. Ch1. Sc1 in each st around. (6sts)
Round 5 – With GREEN. Ch1. Sc1, 2sc in the next st. *Repeat * to * around. (9sts)
Round 6 – Ch1. Sc1 in each stitch around. (9sts)
Round 7 – With WHITE. Ch1. *Sc2, 2sc in the next st.* Repeat * to * around. (12sts)
Round 8 – Ch1. Sc1 in each stitch around. (12sts)
Round 9 – With GREEN. Ch1. *Sc3, 2sc in the next st.* Repeat * to * around. (15sts)
Round 10 – Ch1. Sc1 in each stitch around. (15sts)
Round 11 – With WHITE. Ch1. *Sc4, 2sc in the next st.* Repeat * to * around. (18sts)
Round 12 – Ch1. Sc1 in each stitch around. (18sts)
Round 13 – With GREEN. Ch1. *Sc5, 2sc in the next st.* Repeat * to * around. (21sts)
Round 14 – Ch1. Sc1 in each stitch around. (21sts)
Round 15 – With WHITE. Ch1. *Sc6, 2sc in the next st.* Repeat * to * around. (24sts)
Round 16 – Ch1. Sc1 in each stitch around. (24sts)
Round 17 – With GREEN. Ch1. *Sc7, 2sc in the next st.* Repeat * to * around. (27sts)
Round 18 – Ch1. Sc1 in each stitch around. (27sts)
Round 19 – With WHITE. Ch1. *Sc8, 2sc in the next st.* Repeat * to * around. (30sts)
Round 20 – Ch1. Sc1 in each stitch around. (30sts)
Round 21 – With GREEN. Ch1. *Sc9, 2sc in the next st.* Repeat * to * around. (33sts)
Round 22 – Ch1. Sc1 in each stitch around. (33sts)
Round 23 – With WHITE. Ch1. *Sc10, 2sc in the next st.* Repeat * to * around. (36sts)
Round 24 – Ch1. Sc1 in each stitch around. (36sts)
Round 25 – With GREEN. Ch1. *S11, 2sc in the next st.* Repeat * to * around. (39sts)
Round 26 – Ch1. Sc1 in each stitch around. (39sts)
Round 27 – With WHITE. Ch1. *Sc12, 2sc in the next st.* Repeat * to * around. (42sts)
Round 28 – Ch1. Sc1 in each stitch around. (42sts)
Round 29 – With RED. Ch1. Sc1 in each stitch around. (42sts)
Round 30 – Ch2. *FPDC1, BPDC1.* Repeat * to * around. (42sts)
Pom-Pom
You can make a simple pom-pom with two fingers! Cut a strand of yarn approximately 6” long. Place the strand of yarn between two fingers, close to your hand.
Now wrap yarn around your two fingers until you have a good amount. Pull the ends of the strand around the wound yarn on your fingers, knot, tighten and knot again.
Take it off your fingers now. Add some glue to the center of the pom-pom. Wrap the ends of the strand around again, tighten and knot.
Now cut the curls of yarn and give your pom-pom a nice haircut.
Sew onto your cute little hat.
Mouth
For the mouth separate a piece of black embroidery threat so you have 3 strands left together and sew onto your adorable stuffy!
Belt
With BLACK. Ch.29. Sc into the second ch from the hook. Sc27. Tie off and sew on.
Belt Buckle
With YELLOW and a tiny hook, I used a 2mm hook. Ch14. Tie off and sew on.
You’re done!
I hope you LOVE your elf, and it blesses someone in your life this year.
Subscribe to my newsletter by finding JOIN THE CLUB on the side of the page, so you don’t miss any other fun patterns, crafts, or recipes.
Join our Face book Group! I would love to see what else you’re working on. It’s also a great place to ask question and see fellow crocheters wonderful creations.
MERRY CHRISTMAS!


Hairstyles
Wow, fantastic blog layout! How long have you ever been blogging for? you made running a blog look easy. The entire glance of your site is great, let alone the content!
Alicia
Thanks hun! I tried making a blog with Google some years ago and it was a nightmare, but WordPress makes it easy! This blog is still relatively new, launched this year 🙂