Cuddly Baby Animal Overalls with Footies
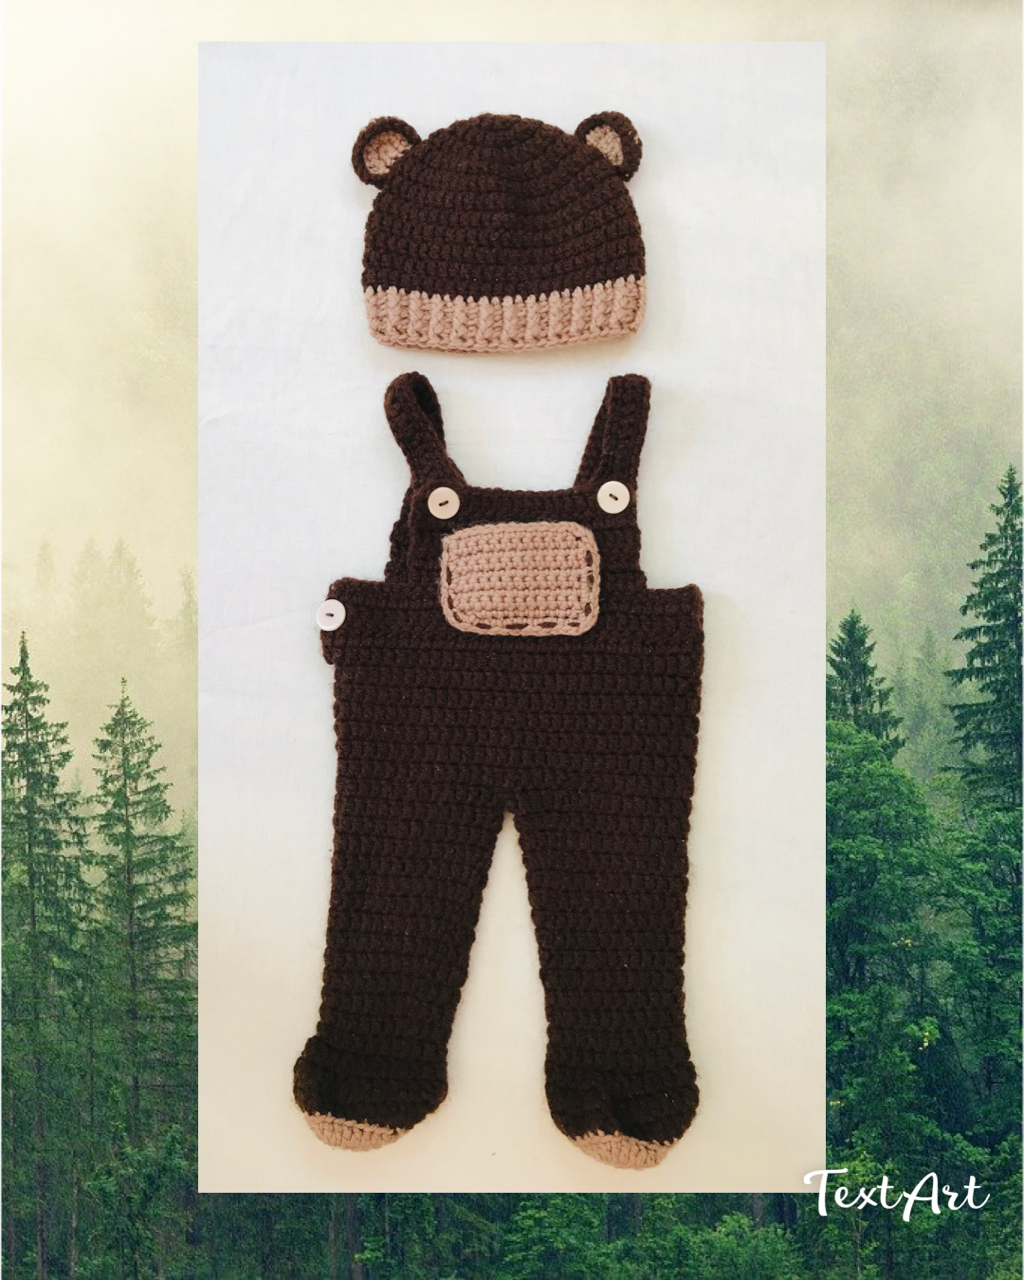
Well my crochet friends, I am very excited to share the free pattern for these simply adorable, newborn, teddy bear overalls and hat! Please share my site, not the pattern if you are going to share.
If you would like to purchase the complete pattern which provides 2 sizes of overalls and hat patterns for the teddy bear, a fun fox, and sweet bunny so you can keep it somewhere safe forever! Follow the link below or find me on Ravelry.

What Materials do you need for this set?
- Bernat Super Value Yarn – Approximately 389 Meters / 426 yards in dark brown/Walnut
- Bernat Super Value Yarn – Approximately 50 Meters in color of choice for the bottom of the footies, hat brim and ears. I used a light brown.
- 4mm crochet hook
- 4 to 6 – ¾ – 1” Buttons
- Darning needle
*** For this pattern I highly recommend checking gauge. *** Also, if the yarns are different brands, check the gauge for each yarn.
Gauge: Ch9. Row 1: Dc in the 2nd ch from the hook and across. (8sts)
Rows 2-4: Ch2, turn. Dc in the same stitch and across. (8sts)
Gauge = 4sts and 2 rows in 1”
Note: In every round/row of this pattern you will make your first stitch in the same stitch unless otherwise stated.

Stitch Abbreviations:
Ch – Chain FPDC – Front Post Double Crochet
Sts – Stiches BPDC – Back Post Double Crochet
Sc – Single Crochet
Sc2tog – Single Crochet 2 together
Hdc – Half Double Crochet
Dc – Double Crochet
Dc2tog – Double Crochet two stitches together
Slst – Slip Stitch

Let’s get crocheting!
Bootie and leg starting with the sole (left side)
With light brown for teddy…
Round 1: Make a magic circle (don’t know how? See the post below, you’ll be so glad you learned!). Ch2. Hdc12. Tighten the circle. Join with a slst. (12sts)
Round 2: Ch2, *2Hdc in each of the next 3sts. Sc3*. Repeat * to * again. Join (with a slst unless otherwise stated). (18sts)
Round 3: Ch2, *Hdc1, 2hdc in each of the next 3sts, hdc1, sc4*. Repeat * to * again. Join. (24sts)
Round 4: Ch1. Sc1. *Hdc2, 2dc in each of the next 3sts, hdc2*. Sc5. Repeat * to *. Sc4. Join with dark brown to change colours. (30sts)
At this point the sole will measure approximately 3.25”.
Round 5: Ch2. In BLO (Back Loops Only), Dc around. Join. (30sts)
Round 6: Ch2. *Dc1, dc2tog*. Repeat * to * 4 times. Dc5. Repeat * to * 2 times. Dc7. Join. (24sts)
Round 7: Ch2. *Dc1, dc2tog*. Repeat * to * 2 times. Dc18. Join. (22sts)
Rounds 8 & 9: Ch2. Dc around. Join. (22sts)
Round 10: Ch2. 2dc in the same st. Dc21. (23sts)
Round 11: Ch2. Dc around. (23sts)
Round 12 – 19: Repeat rounds 10 & 11. (24sts, 25sts, 26sts, 27sts)
Round 20: Ch2, 2dc in the same stitch. Dc26. (28sts)
Tie off. The leg should measure between 6.25- 7”.

Right Side Bootie and Leg
With light brown for teddy.
Round 1: Make a magic circle. Ch2. Hdc12. Tighten the circle. Join with a slst. (12sts)
Round 2: Ch2, *2Hdc in each of the next 3sts. Sc3*. Repeat * to * again. Join (with a slst unless otherwise stated). (18sts)
Round 3: Ch2, *Hdc1, 2hdc in each of the next 3sts, hdc1, sc4*. Repeat * to * again. Join. (24sts)
Round 4: Ch1. Sc1. *Hdc2, 2dc in each of the next 3sts, hdc2*. Sc5. Repeat * to *. Sc4. Join with dark brown to change colours. (30sts)
At this point the sole will measure approximately 3.25”.
Round 5: Ch2. In BLO. Dc around. Join. (30sts)
Round 6: Ch2. Dc1. *Dc1, dc2tog*. Repeat * to * 2 times. Dc5. Repeat * to * 4 times. Dc6. Join. (24sts)
Round 7: Ch2. Dc11. *Dc1, dc2tog*. Repeat * to * 2 times. Dc7. Join. (22sts)
Rounds 8 & 9: Ch2. Dc around. Join. (22sts)
Round 10: Ch2. 2dc in the same stitch. Dc around. Join. (23sts)
Round 11: Ch2. Dc around. Join. (23sts)
Rounds 12 – 19: Repeat rounds 10 and 11.
Round 20: Ch2. 2dc in the same stitch. Dc around. Join. (28sts)
Tie off. The leg should measure between 6.25-7” high.

Joining the Legs and Making the Body of the Overalls
Now we are going to join the legs together and work in a big round to make the body of the overalls.
Press the legs flat with the toes pointed up as you would want them to look when put together.
Join at the right side as pictured.
Round 1: Ch2. Dc13. 2dc in the next st. Now we are going to start to dc into the opposite leg.
Line it up. Dc27. 2dc in the last stitch of this leg. Now jumping back to the other leg where we left off, dc14. Join. (58sts)
This will leave a small hole that you can sew up with one of the tails from finishing the legs.
Round 2: Ch2. Dc around. Join. (58sts)
Round 3: Ch2. 2Dc in the same stitch. Dc28. 2Dc in the next st. Dc28. Join. (60sts)
Round 4: Ch2. 2Dc in the same stitch. Dc29. 2Dc in the next st. Dc29. Join. (62sts)
Round 5 – 8: Ch2. Dc around. Join. (62sts)
Now we are going to work in rows. These rows will create the buttonholes.
Row 9: Ch2. In the FLO. Dc in the same stitch, dc1. Now working through both loops again, dc30. Dc2 in the FLO. (34sts)
Row 10: Ch2. Turn. Dc in the same stitch and across. (34sts)
Row 11: Ch2. Turn. Dc in the same st. Ch1, sk1. Dc30. Ch1, sk1. Dc in the last st. (34sts)
Row 12: Ch2. Turn. Dc across. Tie off. (34sts)
Join onto the 8th st in of the row you just finished.
Row 1: Ch2. Dc in the same st. Dc19. (20sts)
Rows 2 – 5: Ch2. Turn. Dc across. Tie off. (20sts)
Now we are going to start the back of the overalls. Find the two stitches where we only crocheted into the FLO of Row 9. Join into the back loop on the right side of the overalls that is closest to the front of the overalls (the second stitch of Row 9).

Row 1: Ch2. Dc in the same stitch. Dc in the next back loop. Now working through both loops, dc30. Make the last 2dc in the remaining 2 back loops from Row 9. (34sts)
Rows 2 – 4: Ch2. Turn. Dc across. Tie off. (34sts)
Join onto the 8th st in of the last row finished.
Row 1: Ch2. Dc in the same st. Dc19. (20sts)
Rows 2 – 6: Ch2. Turn. Dc across. Tie off. (20sts)
Making the Straps – All Sizes
The strap should measure approximately 6-6.5” long. Leaving a long enough tail to sew onto the overalls, Ch26.
Row 1: Sc into the second ch from the hook and across. (25sts)
Row 2: Ch1. Turn. Sc13. *Ch2, Sk2, Sc2*. Repeat * to * 3 times.
Row 3: Ch1. Turn. Sc across. Tie off. Sew onto the overalls at the back. Repeat for the other strap. Weave in ends.
Sew on the buttons. Take care not to sew the buttons on too tight. You need some space for the strap to fit into.
I like to put a button on the front and back of the overall body so I can attach the strap to the back, but you can still see a button on the front. This is optional of course.
Look at these so sweet wood buttons I found at Michaels!

Making the Pocket
Using your contrasting color…
Ch13.
Row 1: Sc into the second ch from the hook. Sc across. (12sts)
Rows 2 – 9: Ch1. Turn. Sc across. (12sts)
Now ch1 and turn to sc down the side, across the bottom, and back up the other side of the pocket. Invisible join (if possible) to make a neat finish. Leave a long tail if you desire to sew the pocket on with the same color. If not, tie off and cut a length of contrasting color to sew the pocket on.
Making the Hat
With dark brown, make a magic circle.
Round 1: Ch2. Dc10 into the circle. Tighten the circle. Join with a slst. (10sts)
Round 2: Ch2. 2dc into each stitch around. Join. (20sts)
Round 3: Ch2. *Dc1, 2dc in the next st*. Repeat * to * around. Join. (30sts)
Round 4: Ch2. *Dc2, 2dc in the next st*. Repeat * to * around. Join. (40sts)
Round 5: Ch2. *Dc3, 2dc in the next st*. Repeat * to * around. Join. (50sts)
Rounds 6 – 10 (newborn): Ch2. Dc1 in each st around. Join. (50sts)
Change colors. The hat should be around 4” high now.
Round 11: Ch2. Dc1 in each st around. Join. (50sts)
Rounds 12 & 13: Ch2. Fpdc around the dc, not the chain. Bpdc around the next st. *Fpdc1, Bpdc1*. Repeat * to * around. Join. (50sts)
Tie off. Weave in ends.

Teddy Ears
Make a magic circle with light brown…
Row 1 – Ch1. Sc6 in the circle. DO NOT join. (6sts)
Row 2 – Ch1. Turn. 2Sc in the same stitch and each stitch across. (12sts)
Row 3 – Ch1. Turn. Sc in each stitch across. Finish the last sc with dark brown to change colors.
Row 4 – Ch1. Turn. Sc across. (12sts)
Tie off leaving a long enough tail to sew onto the hat. The ears should have a nice curve to them already. I started sewing mine on at the top of row 4 and ended at the bottom of row 6.
That’s it!!! I hope you love your overalls!
Please leave a comment, share, and subscribe so you don’t miss any Cute Little Crochet fun. And come crochet with me on Facebook!
Crochet with Cute Little Crochet
![]()
Want to make a little something to go along with your overall set? You could make Buddy the Bear Basket! 🙂
Happy Crocheting!


