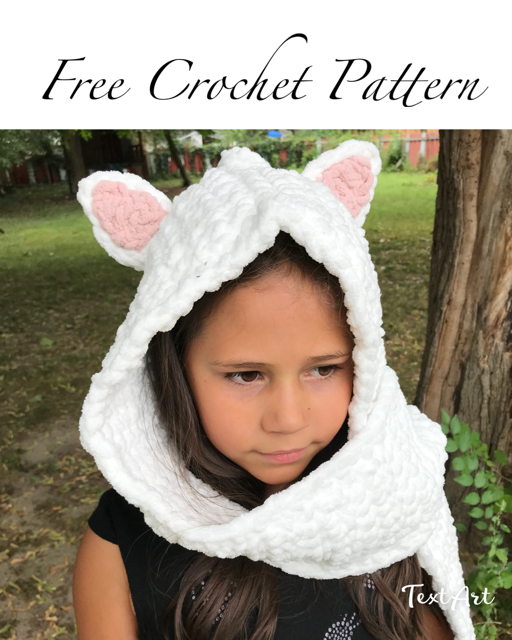
Warm Fuzzy Kitty Scoodie Free Crochet Pattern
Fun – Check!
Cute – Check!
Easy – Check!
Warm – Check!
Free – Check!
Dollar Download – Check!
If you would rather download a PDF version so you’ll never lose this pattern just click the link below.

Maybe paint on a nose, whiskers and make a tail and you have a Halloween outfit too.

What about the yarn?
This pattern uses Bernat Blanket yarn. YES, that fuzzy polyester snuggly yarn that works up fast! It is so soft and very warm. Perfect for fall and winter.
What about the size?
The hood oddly fit us all so well, that I decided to keep the hood piece one size and provided different lengths for the scarf section for ages 4+.
I am a small adult, about 5 foot 3 inches tall, and the one pictured I made for my daughter actually fit me pretty well!

Materials you will need:
– Bernat Blanket in White – Super Bulky 6 – Approx. 220 yards
– Bernat Blanket in Pink (for the Inner Ears) – Super Bulky 6 – approx. 10 yards
– 8mm Crochet Hook
– Darning Needle
Sizes: 4-10+ Years – Approximately 180 – 220 yards
The hood size remains the same for all sizes but the length of the scarf does change to suit children between the ages 4-10+.
Gauge: 2 Rows and 4sts in 2″
NOTES:
The rows all start in the same stitch.
Stitch abbreviations:
Sc: Single Crochet
Dc: Double Crochet
Slst: Slip Stitch
Sts: Stitches
Ch: Chain
This Scoodie is made in two halves and then sewn together. It’s SO easy to make.
So let’s get started!
Make 2 of the following:
Leave a long tail at the start on one of them – about half to three-quarters of a meter. This will be used to sew up the hood. The other tail can be left short as it will just be weaved in.
With an 8mm crochet hook and white blanket yarn, chain 20.
Row 1: Sc into the 3rd ch from the hook and in each ch across. (18sts)
Rows 2 – 11: Ch2. Turn. Dc in each st across. (18sts)
This piece should now measure: 10” x 10”
Do not tie off. We’ll start the scarf section now.
Row 12: Ch2. Turn. Dc8. (8sts)
Repeat row 12 until the scarf piece measures the following for the size you are wanting to make (just the scarf piece – not including the 10” you already finished:
22” long for a 4 or 5-year-old
23.5” long for a 6 or 7-year-old
25” long for an 8-10-year-old
Once you have both pieces made, line them up and sew up the hood using the long tail that you left on one of the pieces. But once again do not tie off yet!


Trim
Now that our hood is sewn up, let’s make a trim. Making a single crochet around the entire piece makes it look much neater! So picking up where you left off… Ch1 and make a sc around the entire item until you are back where you started. I make 2sc in the corner stitches to help round the corners.
Tip: Be sure to only go through one strand as you make your trim, as going around whole stiches can make holes and gaps.
Now that your trim is completed, you can tie off but leave a bit of a tail to sew up one side of a pocket 😊.
Pockets
For the pockets simply fold up about 6 rows of work and sew both sides shut.
The Ears – All sizes
Outer Ear
Ch. 5
Row 1: Sc into the second ch from the hook. Sc in each st across. (4sts)
Rows 2 & 3: Ch1. Turn. Sc across. (4sts)
Row 4: Ch1. Turn. Sc2tog twice. (2ts)
Row 5: Ch1. Turn. Sc2tog. (1sts)
Row 6: Ch1. Turn. Sc1.
Do not tie off. Slip Stitch around the ear. As noted earlier, be sure to only work through one strand of yarn. Going around whole stitches creates gaps and holes.
Once you are almost all the way back around and at the tip of the ear, ch2, slst one more and then join to the first slst you made. Tie off.
Inner Ears
With pink blanket yarn, ch5.
Row 1: Sc into the second ch from the hook. Hdc1. Dc1. Tc1. Tie off.
Assemble the ears. The inner ear should be sewn in so the tip of the inner ear fits right into the tip of the outer ear. The inner ear should not be near the bottom of the outer ear.

Ear Placement
When I sew on the ears, I place them closer to the back of the hood. Approximately 6sts up from the back seam . I fold the bottom row back (the first row of the outer ears) and sew the ears on by going through this row.
You’re done!!! Wasn’t that so quick and easy?
PLEASE SHARE AND LINK BACK TO MY SITE IF YOU LOVED THIS PATTERN 😊.
And Subscribe so you’ll be alerted when I have new content and patterns available.
Leave a comment! I’d love to hear from you.


Hairstyles
Good web site! I truly love how it is simple on my eyes and the data are well written. I’m wondering how I might be notified whenever a new post has been made. I’ve subscribed to your RSS which must do the trick! Have a nice day!
Alicia
Thank so much! xo
Fashion Styles
Wow that was unusual. I just wrote an really long comment but after I clicked submit my comment didn’t appear. Grrrr… well I’m not writing all that over again. Anyways, just wanted to say wonderful blog!
Alicia
That is annoying when that happens haha. Thank you! 🧡
Fashion Styles
Thanks for a marvelous posting! I really enjoyed reading it, you may be a great author.I will remember to bookmark your blog and will eventually come back down the road. I want to encourage yourself to continue your great posts, have a nice day!
Alicia
Bless your heart! ❤