Peter Rabbit Amigurumi Free Crochet Pattern
Want to make sure you don’t lose this pattern? You can download a distraction free PDF version of this pattern for only a dollar from the Dollar Downloads page, or just click the link under the picture below…

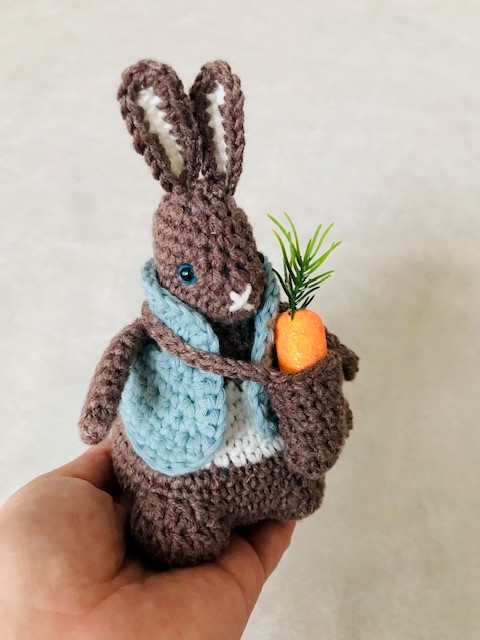
Amigurumi may become a new favorite around here. This was so much fun! And I was so pleased with the result.
Who doesn’t love Beatrix Potter’s beloved bunny family and clever stories?
After Peter was finished I had to make him a vest, and satchel… and then I had to make him a garden! I found some craft carrots that fit perfectly into the garden bed. I included a pattern for it as well. I may add more accessories to this in the future… maybe a sun hat for a girly version, or a little basket to collect garden goodies in. What do you think?
Pair this with some candy and maybe a new bunny book for Easter and you’re set!

Materials you’ll need for this project are:
- Cotton Fair Yarn in Cocoa, Cream and Baby Blue; Weight – Fine 2
- Medium 4 weight yarn in a dark brown for the garden
- 3mm crochet hook
- 6mm Safety Eyes
- Darning Needle
- Ivory or White Embroidery Thread
- Craft Carrots or other veggie
Gauge:
I don’t think you need worry about gauge for this pattern too much, just ensure your stitches aren’t too lose.
Size:
When finished your bunny will be approximately 5.5” tall, and 3” wide at the bottom.

Let’s get started!
With your 3mm hook and brown, make a magic circle.
Don’t know how to make the magic circle? Check out the tutorial below. It’s so easy! You’ll be so glad you did.
Round 1 – Ch1. 10sc in the circle. Tighten the circle. (10sts)
Place your stitch marker.
Replace the stitch marker at the end of each round as this pattern is worked in a continuous round. You may want to keep a stitch marker in the previous round as well in case you miscount or make an error and must go back a round.
Don’t have fancy stitch markers yet? You can easily use a bobby pin that’s lying around.
Round 2 – 2sc in each st around. (20sts)
Round 3 – Sc1, 2sc in the next st. Repeat around. (30sts)
Round 4 – Sc4, 2sc in the next st. Repeat around. (36sts)
Round 5 – Sc5, 2sc in the next st. Repeat around. (42sts)
Round 6 – Sc1, Dc2 in each of the next 3sts. Sc6. Dc2 in each of the next 3sts. Sc29. (36sc, 12dc)
Round 7 – Sc1. *2Dc in each of the next dc sts*. Sc6. Repeat * to *. Sc29. (36sc, 24dc)
Try to ensure your tension is nice and tight for the decreases.
Round 8 – Sc1. *Dc2tog 6 times*. Sc6. Repeat * to *. Sc29. (36sc, 12dc)
Round 9 – Sc1. *Dc2tog 3 times*. Sc6. Repeat * to *. Sc29. (36sc, 6dc)
Round 10 – Sc42. (42sts)
Round 11 – Sc16. *Sc2tog. Sc4*. 4 times. Sc2. (38sts)
Round 12 – Sc38. (38sts)
Round 13 – Sc4. Finish the last sc with cream. Sc7 with cream. Finish the last sc with brown. Sc8. Sc2tog. Sc11. Sc2tog. Sc4. (36sts)
From here on I am going to simply say to change colors. Remember to do so by finishing the last stitch with the next color.
Round 14 – Sc4. Change to cream. Sc6. 2sc in the next st. Change to brown. Sc2tog. Sc9. Sc2tog. Sc5. Sc2tog. Sc5. (34sts)
Round 15 – Sc4. Change to cream. Sc7. 2sc in the next st. Change to brown. Sc2tog. Sc7. Sc2tog. Sc5. Sc2tog. Sc4. (32sts)
Round 16 – Sc4. Change to cream. Sc2og, sc1, 3 times.
Change to brown. Sc to the end of the round. (29sts)
Round 17 – Sc4. Change to cream. Sc2tog, sc1, 2 times. Change to brown. Sc to the end of the round. (27sts)
Round 18 – Sc around the entire round. (27sts)
Round 19 – Sc7. Sc2tog. Repeat around. (24sts)
Round 20 – Sc2. Sc2tog. Repeat around. (18sts)
Stuff the body now.
Round 21 – Sc1. Sc2tog. Repeat around. (12sts)
Starting the head…
Round 22 – Sc1, 2sc in the next. Repeat around. (18sts)
Round 23 – Sc2, 2sc in the next. Repeat around. (24sts)
Round 24 – Sc6. 2sc in each of the next 3sts. Sc15. (27sts)
Round 25 – Sc.7. Sc2tog 3 times. Sc14. (24sts)
Round 26 – Sc6. Sc2tog 3 times. Sc12. (21sts)
Round 27 – Sc6. Sc2tog 2 times. Sc11. (19sts)
Round 26 – Sc around. (19sts)
Put in safety eyes if using. I placed mine between rounds 23 and 24, back from the nose about 2 centimeters back from the tip of the nose.
Sew on the nose.
Round 27 – Sc1, Sc2tog. Repeat around. Sc1 in the last st (14sts)
Stuff head.
Round 28 – Sc2tog around until the space is nearly closed in. Tie off. Sew up and weave in ends.

Arms
Make a magic circle.
Sc 6.
Rounds 1 -9 – Sc around.
Tie off and sew onto the body. I placed mine only a round below the neck.
Ears
With cream.
Ch8.
Round 1 – Slst into the second ch from the hook. Slst 6. Ch2. Now working down the other side of the ch, Slst7. Join. (16sts)
Join with brown.
Round 2 – Sc7. 2sc in each of the next 2sts. Sc7 down the other side. Join. Tie off, sew on side by side right on the top of the head. Weave in ends.

Vest
Ch19.
Row 1 – Sc into the second ch from the hook and across. (18sts)
Row 2 – Ch1. Turn. 2Sc in the first st. Sc1. Ch5. Sk5. 2sc in each of the next 4sts. Ch5. Skip5. Sc1, 2sc in the last st. (24sts)
Row 3 – Ch1. Sc across. (24sts)
Row 4 – Ch1. Turn. 2sc in the first st. Sc11. 2sc in the next st. Sc10. 2sc in the last st. (27sts)
Row 5 – Ch1. Turn. Sc across. (27sts)
Row 6 – Ch1. Turn. 2sc in the first st. Sc12. 2sc in the next st. Sc12. 2sc in the last st. (27sts)
Now we’re going to work a sc around the entire sweater.
Ch1. Work up the side. Making a sc in each row. Make 1 more single crochet in the corner. (7sts)
We’re going to double crochet across the top. Dc1, 2dc in the next, across the top. (34sts)
2Sc in the corner. Sc4. 2sc in the bottom corner. Sc across the bottom of the sweater. Join.

Pom Pom Tail
With cream. Cut a strand that is approximately 12’’ long. There are pictures just below on the next page as well.
Place the strand between two fingers. Pick up new yarn and start wrapping it around the two fingers. Wrap 100 times.
Tighten and knot the 12” strand around the yarn. Remove your fingers. Continue to flip it over and tighten and knot the 12” strand around a few more times.
Put some super glue or glue in the center to prevent strands from pulling lose.
Fluff it all up and give it a generous haircut!

Bag
With brown and your 3mm hook. Ch9. Leave at least an 8” tail. It will be used to sew up one side of the bag later.
Row 1 – Sc in the second ch from the hook. Sc7. (8sts)
Rows 2 – 16 – Ch1. Turn. Sc across. (8sts)
Do not tie off. Ch.28. Slst into the second ch from the hook and back down the ch. Once you reach the bag, slst into the side and tie off leaving an 8” tail to sew up that side of the bag.
Fold the bag in half and sew up the side you just finished. Attach the other side of the handle and sew up the opposite side.
Turn the bag inside out.

Garden Bed –
With a 5mm hook and worsted 4 weight brown yarn.
Ch.31.
Row 1 – Sc into the second ch from the hook. Sc29. (30sts)
Rows 2 – 6 – Ch1. Turn. Sc across. (30sts)
Row 7 – Ch1. Turn. *Sc2. Ch5. Skip5 sts.* Repeat * to * 3 more times. Sc2. (30sts)
Row 8 – Ch1. Turn. Sc across. I just made 5sc in each of the ch5 spaces instead of working through each ch st. (30sts)
Rows 9 – 11 – Ch1. Turn. Sc across. (30sts)
Row 12 – Ch1. Turn. Sc4. Ch5. Skip 5. *Sc3, Ch5, Skip5* Repeat * to * one more time. Sc5. (30sts)
Rows 13 – 16 – Ch1. Turn. Sc across. (30sts)
Row 17 – Repeat round 7. (30sts)
Rows 18 – 21 – Ch1. Turn. Sc across. (30sts)
Row 22 – Repeat Row 12. (30sts)
Rows 23 – 28 – Ch1. Turn. Sc across. (30sts)
Ch1. Sc around the entire garden making 3sc in each corner.
Tie off, weave in ends, add some fun veggies and you are DONE!
I hope you loved this pattern!
Please
SHARE and SUBSCRIBE
Happy Crocheting!


Kaninchen Häschen Amigurumi Kostenlose Häkelanleitung - Tagebuch einer Frau
[…] Kaninchen Amigurumi […]
Alicia
❤❤❤