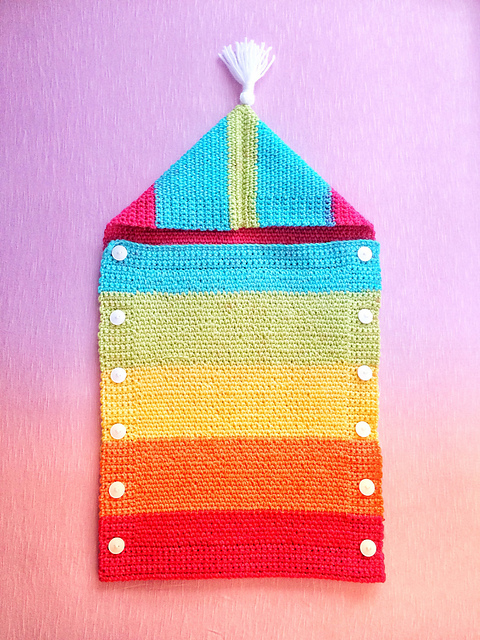
Rainbow Baby Sleep Sack – Free Pattern
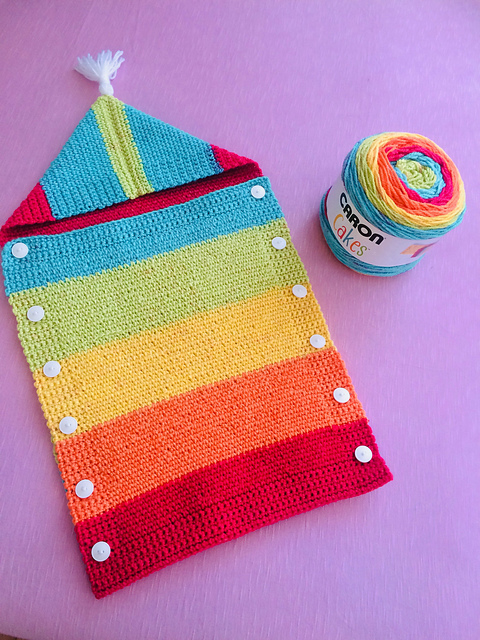
There is a link to the yarn below in a number of different colors.
Maybe you’d prefer something with boy colors, or a little more girly. Pistachio, Blueberry Scone, Cake Roll, Boysenberry! So many amazing options, I’m drooling. And if you purchase from one of these links you help support this blog and my family so I can continue to create free fun patterns for you. Just be sure to check the yardage recommendation to ensure you order enough. The big cakes are enough for the whole pattern, but some smaller ball sizes you will need multiple.
- Rainbow Sprinkles Caron Cake – Approximately 500 yards
- 5mm crochet hook
- 12- ¾’’ white buttons
- Darning Needle
Let’s get started!
You can download a distraction free, clean PDF for free if you subscribe!
Size:
Row 1 – Sc in the second ch from the hook and across. (10sts)
Rows 2-10 – Ch1, turn. Sc across. (10sts)

Stitch Abbreviations:
Ch – Chain Sk – Skip a stitch
Sc – Single Crochet Slst – Slip Stitch
Special Stitch – Knit stitch
The knit stitch is worked the same as a single crochet, but instead you insert the
hook into the vertical v below. See image. It’s as simple as that! If you do find this
stitch tricky or frustrating a single crochet would work just fine throughout the pattern as well.

Optional – For the front only, I did twice cut off extra yarn so that my color
change would be right at the end of the row. Most of the colors naturally changed
near the ends and were subtle enough that I didn’t mind, but do whatever suits
you and need to do as Caron Cakes won’t all work up exactly the same 🙂
We’re beginning at the top of the front piece.
Ch.51
Row 1 – Sc into the second ch from the hook and across. (50sts)
Row 2 – Ch1, turn. Sc across. (50sts)
Row 3 – Ch1, turn. Sc2, Ch1, Sk1, sc44, Ch1, Sk1, Sc2. (50sts)
Rows 4-6 – Ch1, turn. Sc across. (50sts)
Now we’ll be starting to include the knit stitch in our rows. The first knit stitch of
the row will start in the sc just under the sc you just finished even though you
may be tempted to start in the next. See a visual below…

Rows 7-16 – Ch1, turn. Sc6, knit stitch 38, sc6. (50sts)
Row 17 – Ch1, turn. Sc2, Ch1, Sk1, Sc3. Knit Stitch 38. Sc3, Ch1, Sk1, Sc2. (50sts)
Rows 18-30 – Ch1, turn. Sc6, knit stitch 38, sc6. (50sts)
Row 31 – Ch1, turn. Sc2, Ch1, Sc1, Sc3. Knit stitch 38. Sc3, Ch1, Sk1, Sc2. (50sts)
Now repeat Rows 18-30 and row 31 until the piece measures approximately 14”
long.
The last row of mine ended exactly at a row 31, creating 6 buttonholes on each
side. This would be ideal, but 5 or 7 on each side would be fine as well.
Now make 6 rows of sc to finish the front edging. Do not tie off. Continue with
the back of the bag.
Back of the bag
Continue to make sc rows until when folded in half it is the same length as the
front. Roll it up like a carpet to make turning easier if desired.
Do not tie off, continue with the hood.
Hood
Once again starting with the knit stitch pattern…
Row 1 – until hood measures 8’’ – Ch1, turn. Sc6, knit stitch 38, sc6. (50sts)
Determine which side you think looks best. Turn the hood wrong side out and slip
stitch up the seam. Tie off. Weave in ends.
Sew on the buttons. I close the bag, and starting at the top put my finger through the
hole, then place the button and sew it on. Then I close the bag fastening the
button I had just sewn on, and repeat (placing my finger through the next hole to
place the next button). I do all the buttons on one side, then do the other side
the same way.
Making the Tassel
Step 1: Cut a strand approx. 1.5 ft long and fold it in half. Knot the folded end
together a few times to form a fair-sized knot.

Step 2: Wrap 15 rounds of yarn at about 8-9” long. See picture below.

Step 3: Place the string you prepared in step one near the center but off to one
side.

Step 4: Cut another 6-8″ long strand and use it to tie around the center, taking
some care that the knot of off to one side and surrounded by the yarn.
When you pick up the strands from step one, you should be able to fan out the
strands around the knot like the picture below.

Step 5: Fan out the tassel around the knot. With another string, fasten around the
tassel to create the ball at the top as the picture below.


Step 6: With your yarn, create a loop as pictured below, and place over the tassel.

Step 7: Wrap the yarn around a number of times to your liking. Ensuring the the loose end is still sticking out of the top. Cut the yarn.

Step 8: Feed the tail of the yarn through the loop you created in step 6. Then pull
the other tail at the top of the tassel and it will pull the end inside.

Step 9: Trim the ends. Cut the tassel so it measures approx. 3.5”long.

Sew onto your baby bag and enjoy!!!
The finished bag measured approximately 23” long by 13” wide.
You’re Done!


