I have always adored nesting dolls since I was a little girl, and have wanted to crochet some.
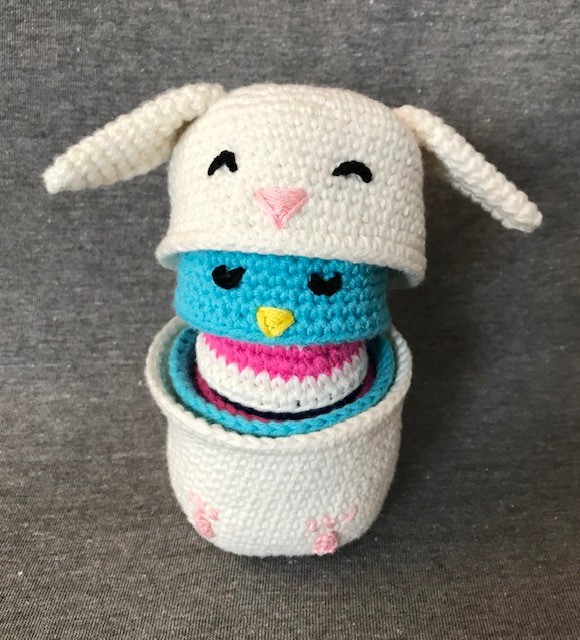
Since Easter is on it’s way I decided to make an Easter themed nesting doll set which is available for purchase in the Pattern Shop. Could they be any cuter?!
This pattern uses Premier Cotton Fair yarn. You’ll require a 2.5mm crochet hook, a darning needle and boning. Boning is optional as is discussed shortly, but I highly recommend it.
I try to provide links to materials whenever possible to make them easy for you to find.
This post contains affiliate links by which I could earn a commission. Your support is greatly appreciated and can help make this blog free to maintain. See the full disclosure HERE.
These little guys work up quite fast. Fun to make for you. Sure to please and intrigue the kids.
The egg comfortably holds a medium sized plastic Easter Egg, hard-boiled egg, or whatever candy or treasure you have in store to light up their eyes.
I’ve shared the egg pattern below for free! Get creative with designs. I have seen some beautifully embroidered ones. Zeen’s & Roger , for example, shows you a few of their adorable embroidered eggs on their site.
What is boning?
Something I have discovered and love, is boning. It is used in garments like bras and corsets for example to add stability. I’ve used it in hats and now toys. This pattern uses boning around the rims to make them really stand out and keep their shape. You can see a picture of the boning I purchased below.
I purchased my boning at a Fabricland. It is sold by the meter. Clear 100% nylon boning. I highly recommend using it!
It is too thick initially to single crochet around mind you, so it has to be cut lengthwise. See the pictures below. The one I got cut nicely into 4 strips. A couple hold onto to more of the fibers than others, but they all work well to provide the rims with good form.
Free Crochet Easter Egg Pattern
Materials:
– Cotton Fair cotton/acrylic yarn in turquoise, bright pink, and cream
– Boning to provide support for the brims – cut to fit
– Black, yellow and pink embroidery thread for eyes, beak, and feet.
– 2.5mm crochet hook
– Darning Needle
Notes:
The first stitch of each round is made in the same as the stitch, for the entirety of the pattern.
I prefer to work in rounds for the egg instead of amigurumi style as I find the color changes a bit neater, but that is up to you. There are some great tutorials online about how to make neat amigurumi color changes if you wish to invest the extra time to do so.
The colors are referred to in the pattern as: Blue = B, White = W, Pink = P
Egg Bottom
Make a magic circle with B.
Round 1 – Ch.1, sc10 in the circle. Tighten. Join. (10sts)
Round 2 – Ch1. 2sc in each st around. Join. (20sts)
Round 3 – With W. Ch1. *Sc1, 2sc in the next st.* Repeat from * to * around.
Join. (30sts)
Round 4 – Ch1. *Sc9, 2sc in the next st.* Repeat * to * around. Join. (33sts)
Rounds 5 & 6 – With P. Ch1. Sc around. Join. (33sts)
Rounds 7 & 8 – With W. Ch1. Sc around. Join. (33sts)
Rounds 9 & 10 – With B. Ch1. Sc around. Join. (33sts)
Rounds 11 & 12 – With W. Ch1. Sc around. Join. (33sts)
Round 13 – With P. Ch1. Sc around. Join. (33sts)
***Optional, but highly recommended*** Cut a small piece of boning, about 6”.
Cut it in strips length wise. And crochet around one of the pieces for the next
round.
Round 14 – With P. Ch1. Sc around. Join. (33sts)
Tie off. Weave in ends.
Egg Top
Mage a magic circle with B.
Round 1 – Ch1. 5Sc in circle. Tighten. Join. (5sts)
Round 2 – Ch1. 2Sc in each st around. Join. (10sts)
Round 3 – With W. Ch1. *Sc1, 2sc in the next st.* Repeat * to * around. Join. (15sts)
Round 4 – Ch1. *Sc2, 2sc in the next st.* Repeat * to * around. Join. (20sts)
Round 5 – With P. Ch1. *Sc3, 2sc in the next st.* Repeat * to * around. Join. (25sts)
Round 6 – Ch1. Sc11, 2sc in the next st. Sc12, 2sc in the next st. (27sts)
Round 7 – With W. Ch1. Sc6, 2sc in the next st. Sc13, 2sc in the next st. Sc6. Join. (29sts)
Round 8 – Ch1. Sc13, 2sc in the next st. Sc14, 2sc in the next st. Join. (31sts)
Round 9 – With B. Ch1. Sc8, 2sc in the next st. Sc13, 2sc in the next st. Sc8. (33sts)
Rounds 10 & 11 – With W. Ch1. Sc around. Join. (33sts)
Cut a suitable length of boning; a bit more than the circumference. And crochet around one of the pieces for the next round.
Round 12 – Ch1. Sc around. Join. (33sts)
Tie off. Weave in ends.
Gently stretch out the rims. You don’t want to stretch them out too far. But
stretching them out a little bit makes them sit together much nicer.
You’ll also want to apply some crazy glue to the ends of the boning to ensure
they stay put.
Sew top and bottom together. Pay attention to line up the seams first 😊.
I recommend sewing from the outside, otherwise it won’t close as nicely.
I hope you enjoyed this free pattern! Happy Easter!
Hello! It's so nice to meet you. I'm Alicia.
Crocheter, Creator and Cook.
I'm mother to five amazing kids who inspire me every day to be a better person, have fun, love with no limits, never give up, and make the world a more beautiful place.
I hope you find some happiness here.